Pokud máte spustitelnou (bootovatelnou) SD kartu a ve Vašem fotoaparátu nastavený příznak BOOTDISK (jež instalační program nastavuje) a přitom nemáte na paměťové kartě soubor AUTOEXEC.BIN, fotoaparát SE NESPUSTÍ! Zasekne se, dokud nevyndáte baterii.
Pokud fotoaparát přestane reagovat, rychle vyndejte baterii. V opačném případě může být ARM procesor v prudké smyčce a rychle se rozpálit. Vaše baterie se vybije a Váš LCD displej by mohl vykazovat změnu barev.
Máte-li pochybnosti, vyndejte baterii a fotoaparát restartujte.
A pamatujte, že tento software může poškodit nebo zničit Váš fotoaparát.
Ne. Magic Lantern běží z karty jako rozšíření standardního firmwaru. Stále budete mít přístup ke všem funkcionalitám standardního firmwaru Canon.
Pro návrat do standardního firmwaru Canon můžete:
Přidržet tlačítko spouště namáčknuté do poloviny během spouštění fotoaparátu, abyste obešli ML pouze jednou (pro aktuální sezení).
Zformátovat Vaši kartu (tím se ML z karty smaže).
Zakázat bootflag (tím se ML odinstaluje z fotoaparátu; spusťte aktualizaci firmwaru a pokračujte podle instrukcí).
Jak smažu všechny snímky, aniž smažu ML?[]
Canon menu (záložka Přehrát 1 (modrá) ) -> Smazání snímků -> Všechny snímky na kartě.
Poznámky:
Tímto nebudou smazány soubory, které vytvořil ML (jako *.LOG, *.422, *.SH). Tyto soubory budete muset smazat v PC.
Zformátováním karty se z ní ML smaže. Pokud to uděláte, budete muset znovu učinit tuto kartu spustitelnou (bootovatelnou) a následně na ni nakopírovat soubory Magic Lanternu (viz. Krok 2. Instalace).
Jak natočím více než 12 minut?[]
Neexistuje žádný 12 minutový limit. Limity videí jsou pouze 30 minut a 4 GB v závislosti na tom, který z nich nastane dřív. Můžete buď snížit datový tok nebo použít funkci restartování videa.
S výchozím nastavením nastavením datového toku je limit 4GB dosažen zhruba po 12 minutách.
Mohu natočit více než 30 minut / 4 GB v kuse?[]
Můžete použít funkci restartování videa, ale přijdete o pár sekund během vytváření nového souboru.
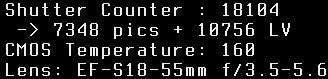
Jak zobrazím počet zavření závěrky / teplotu CMOS senzoru?[]
MENU -> DISP (550D, 500D).
Stiskněte tlačítko INFO v režimu focení, mimo LiveView (60D, 600D).
Poznámka: Teplota CMOS senzoru je uváděna v surových jednotkách (teplota EFIC), viz. teplota CMOS senzoru.
Musím nastavovat ISO/závěrku/clonu/WB pouze v ML menu?[]
Ne, můžete je nastavit jak v ML menu, tak pomocí rozhraní Canon.
Poznámka: Uživatelská nastavení, která nejsou dostupná ve standardním firmwaru (jako vyvážení bílé v Kelvinech na amatérských DSLR řady xxxD / xxxxD/ Rebel) nemusí být rozhraním Canon správně zobrazena.
To switch back to photo mode, you need to turn the mode dial back and forth one notch.
Spotřebovává ML rychleji baterii nebo způsobuje přehřívání?[]
Ano i ne, v závislosti na tom, které vlastnosti jste povolili. Například focus peaking, nepravé barvy, tvar vlny (waveform), zebra pruhy (a možná další) jsou náročné na výpočetní výkon. Spotřeba může být přesto snížena vypnutím LCD nebo rychlou změnou úrovně podsvícení. Více informací viz. [[#power-saving|šetření energie].
Nejlepšího zvuku dosáhnete použitím předzesilovacího systému napojeného na fotoaparát. Zpravidla má použití tichého předzesilovače k zasílání signálu do fotoaparátu za následek lepší kvalitu zvuku. Skvělých výsledků dosáhnete při použití předzesilovače s XLR adaptérem jako JuicedLink CX231 field mixeru. Můžete také použít nahrávací zařízení jako Zoom H1, H2 nebo H4n, ale budete muset zeslabit výstupní signál nebo použít pad kabel, protože výstupní síla signálu je mnohem vyšší než akceptovatelná síla vstupního signálu z mikrofonu. Více viz. diskuzní téma (anglicky).
Pokud nepoužíváte externí předzesilovač, mikrofon Rode VideoMic PRO má vestavěný +20dB zesilovač navržený pro DSLR. Mikrofon Rode VideoMic (bez značky PRO) je znám slabým výstupním signálem při použití s DSLR Canon bez dodatečného předzesilovače.
První sekunda nahraného audia může být velmi hlasitá.
Někdy funkce posunout zaostření (rack focus) a bracketing ostření (stack focus) odmítají pracovat a je třeba restartovat fotoaparát.
Někdy je menu překresleno Canonovými vykreslovacími procedurami nebo poblikává.
Externí monitory nejsou zatím plně podporovány (některé funkce nemusí fungovat / zobrazovat se správně). Aby mohl Magic Lantern použít většinu grafických překreslení (položky z LiveV menu), je třeba povolit Force HDMI-VGA.
Je známo, že s HDMI displeji s vysokým rozlišením fungují správně pouze značky pro ořez (cropmarks) (z menu LiveV).
Ne všechny vlastnosti Magic Lanternu jsou k dispozici na všech podporovaných fotoaparátech.
Klávesové zkratky[]
Zkratky pomocí LCD senzoru[]
Tato vlastnost je k dispozici pouze na 550D a 500D.
Namáčknutí spouště do poloviny během spouštění: načte „vanilla firmware“ (nespustí Magic Lantern). Může vyžadovat spuštění v jednom z těchto režimů: P, Tv, Av nebo M.
ISO pak LiveView: přepnout do video režimu (z režimu focení). Pro přepnutí zpět do režimu focení musíte přepnout otočný volič režimů o jeden stupeň a zpět.
ISO, pak DISP (550D) / Měření (60D): přepnout aktuální předvolbu displeje.
Zvětšit (+) během nahrávání: dělá přesně to (Magic Zoom)
Q následované tl. SET uvnitř dialogu Citlivost ISO: přejít na položku ISO v ML menu.
Q (550D), Odemknout (60D) nebo DISP (600D) v režimu přehrávání: vykreslit tyto položky z LiveV menu: zebra pruhy, nepravé barvy, histogram, tvar vlny (waveform), bodový měřič (spotmeter) a značky pro ořez (cropmarks).
Tl. LiveView v režimu přehrávání nebo rychlé prohlídky: vytvořit z aktuálního obrázku průhledné překreslení. Toto překreslení můžete poté v režimu LiveView posouvat pomocí šipek. Pro deaktivaci překreslení běžte do režimu přehrávání (tl. Přehrávání) a zpět, aniž stisknete tlačítko LiveView na dalším snímku.
DISP + Zvětšit (+) / Zmenšit (-) na 600D mimo nahrávání: rychle povolit / zakázat 3x zoom.
Magic Lantern menu[]
Pro zobrazení menu stiskněte tlačítko Vymazat; k navigaci v menu použijte šipky.
Ke změně hodnot použijte SET, Přehrát a Q. U většiny položek v menu můžete:
stisknout SET pro změnu hodnoty vpřed
stisknout Přehrát pro změnu hodnoty vzad
stisknout Q pro vyvolání speciální akce (viz. text nápovědy nebo rady na displeji)
Komplexní položky menu mohou pro tato 3 tlačítka používat jiné akce. Vizte prosím dokumentaci ke konkrétní volbě.
V režimu fotografování, mimo LiveView, můžete pro navigaci v ML menu použít otočný volič / voliče. Stisknutím tlačítka Zvětšení (+) aktivujete režim editace a hodnotu položky můžete změnit otočným voličem (experimentální).
Stisknutím tlačítka DISP nebo INFO získáte nápovědu ke konkrétní položce.
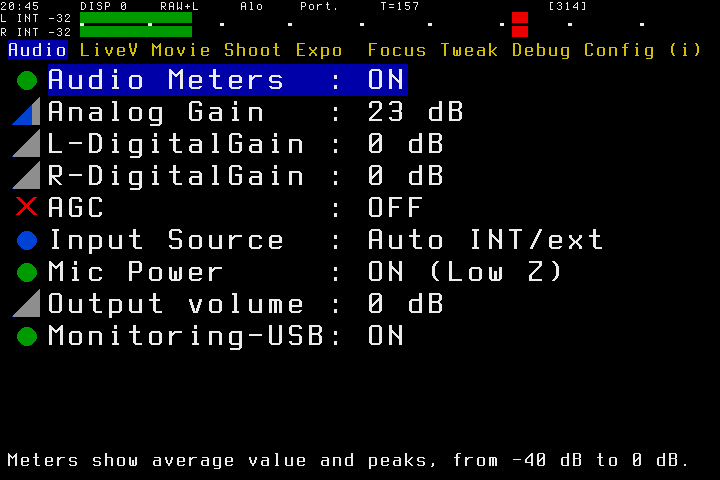
600D/T3i již manuální ovládání audia má, ale v současné době není možné změnit toto nastavení pomocí Magic Lanternu. Můžete pouze použít audio měřiče během nahrávání.
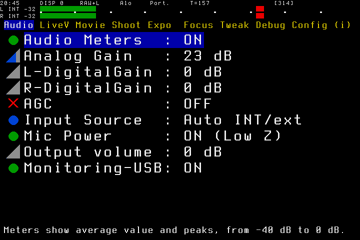
Audio Meters: ON / OFF (audio měřiče)
Vykreslit audio měřiče nebo ne. Toto nastavení se týká pouze režimu videa.
Rozsah úrovně udia je od -40dB do 0dB.
Analog Gain (dB) (analogové zesílení)
Zesílení aplikované na oba vstupy v analogové oblasti - zamýšleno jako předzesilovač mikrofonu, ale vždy je vhodnější užití digitálního zesílení (pokud nechcete odlišné zesílení nebo vyčerpat analog).
L-DigitalGain a R-DigitalGain (dB) (digitální zesílení levého, resp. pravého kanálu)
Digitální zesílení aplikované odděleně na levý (L) kanál a pravý (R) kanál.
AGC: ON/OFF (automatická kontrola zesílení, Automatic Gain Control)
Povolit/zakázat automatickou kontrolu zesílení. AGC je aplikováno pouze v digitální oblasti (např. potlačuje nastavení digitálních zesílení, ale manuální nastavení analogového zesílení je stále k dispozici).
Zakažte tuto volbu pro zabránění vzniku akustického šumu při nahrávání ticha.
L:int R:balanced (levý kanál:interní; pravý kanál:vyvážený) (interní mikrofon na levém kanálu, externí mikrofon na pravém kanálu z obou externích pinů jako vyvážené audio)
Auto int/ext: fotoaparát rozpozná, zda je připojen mikrofon. Interní mikrofon je duální mono, externí je stereo.
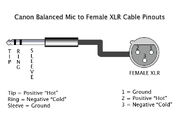
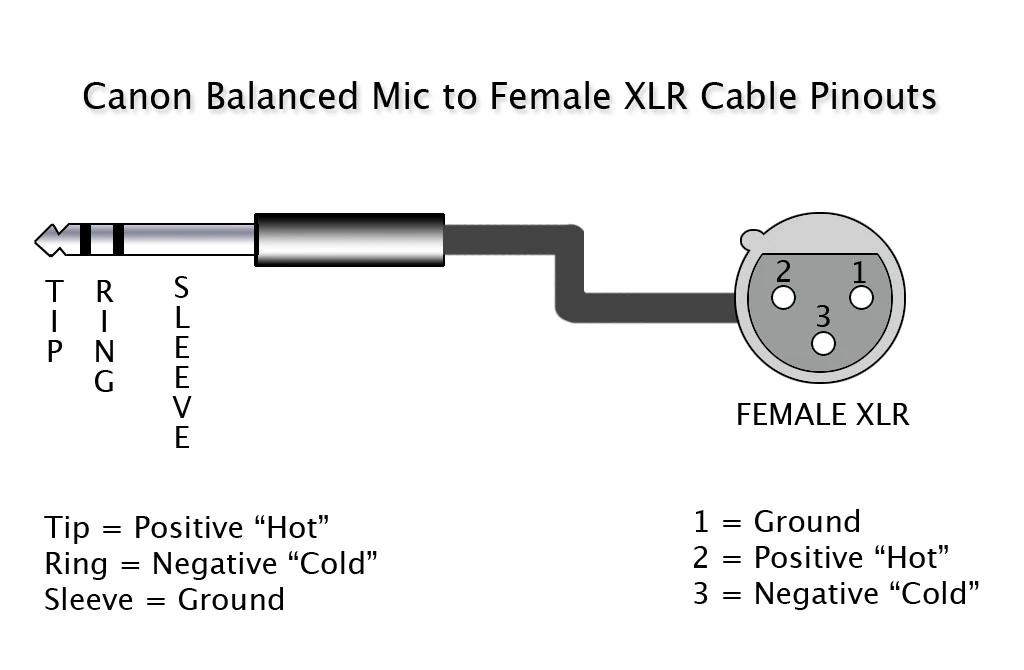
Zapojení XLR mikrofonu do vyváženého vstupu
„Vyvážené audio umožňuje použití velmi dlouhých kabelů, aniž by došlo k interferenci. Vyvážené mikrofony mají obvykle třípinové XLR konektory a je velmi snadné vyvést je do vstupního kabelu pro mikrofon Canon. Vyvážené audio nám umožňuje použití profesionálních mikrofonů s našimi malými Canony, což je velice vítané překvapení pro audio hračičky.“ (zdroj, anglicky)
Tato volba je vždy zapnuta, pokud je zdroj vstupu (input source) nastaven na interní mikrofon (internal mic) nebo levý kanál:interní; pravý kanál:externí (L:int R:ext).
Monitoring-USB: ON/OFF (kontrolování audia přes USB)
Audio monitoring pomocí sluchátek, skrze USB port.
Tato vlastnost není k dispozici na 600D/T3i.
K použití audio monitoringu potřebujete speciální kabel:
Hlasitost pro audio monitoring. Toto nastavení nemá vliv na interní reproduktor fotoaparátu.
Pro nejlepší výsledky použijte sluchátka s nízkou impedancí, např. Audio Technica ATH-M50 (38 ohmů). S vysokoimpedančními sluchátky můžete použít sluchátkový zesilovač jako např. FiiO E5.
LiveV[]
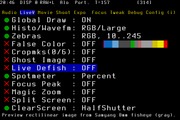
LiveV menu
Překreslení v LiveView: histogram, zebra pruhy, značky pro ořez (cropmarks), bodový měřič (spotmeter), focus peaking, nepravé barvy, ...
Global Draw: ON/OFF (globální vykreslování)
Povolit/zakázat vykreslování dodatečných grafických prvků (zebra pruhy, značky pro ořez (cropmarks), histogram, tvar vlny (waveform), nepravé barvy, bodový měřič (spotmeter), audio měřiče, ML informace o focení, ...).
Tip: Použijte toto nastavení pro rychlé vypnutí těchto prvků.
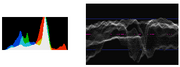
Histo/Wavefm: ON/Luma/RGB pro histogram, OFF/Small/Large/Fullscreen pro tvar vlny (waveform)
Zobrazuje šíření úrovní jasů snímku pomocí:
políčka histogramu: Luma (jas) / RGB, přepínání pomocí SET
políčka tvaru vlny (waveform): Small (malé) / Large (velké) / Fullscreen (celá obrazovka), přepínání pomocí Q
Povolit/zakázat zebra pruhy, které indikují přeexponovaná a podexponované místa.
Režimy:
Luma (jas): zebra pruhy jsou počítány pouze z kanálu Y (=jasová složka YUV modelu); přeexponovaná místa jsou červená, podexponovaná modrá.
RGB: přeexponovaná místa jsou počítána z RGB kanálů, podexponovaná z Y. Přepaly v kanálech jsou zobrazeny v opačné barvě (např. přepal v červeném kanálu je zobrazen azurovou barvou (cyan), podpal bílou, ...).
Tlačítka:
SET: přepnout mezi OFF/Luma/RGB
Přehrát: změnit práh pro podpaly (černá místa)
Q: změnit práh pro přepaly (bílá místa)
Hodnoty jasu jsou v rozsahu 0 až 255. Práh 0 zakáže zebra pruhy pro podpaly, 255 pro přepaly.
Poznámka: Při použití stylů Technicolor CineStyle Picture Style bude mít jas hodnoty v rozsahu 16 až 255; budete tedy muset nastavit práh podpalů na 16 nebo víc.
False color (nepravé barvy)
Toto je nástroj pro hodnocení expozice, který s použitím barevné mapy zobrazuje odlišné úrovně jasu (Y). Stisknutím Q můžete vybrat jednu z následujících map:
Palety nepravých barev
Tip: Nastavení předvoleb displeje s nepravými barvami Vám umožní jejich přepnutí jediným stiskem tlačítka.
Cropmks(x/n) (značky pro ořez)
Vybrat značky pro ořez.
V zip archivu jsou předdefinované 4 značky pro ořez:
16:9 černé pruhy
HD s titulkem a akčně bezpečné (Title & Action Safe)
Cinemascope
Rybí oko pro rámování snímků s objektivem Samyang 8mm Fisheye.
Poznámky:
Ve výchozím nastavení jsou značky pro ořez zobrazovány pouze v režimu videa. V režimech pro fotografování je můžete povolit v menu Tweaks, viz. konfigurační volba Show cropmarks in: Movie mode / All modes.
Používáte-li vlastní značky pro ořez, uložte je do složky CROPMKS na Vaší SD kartě a dejte jim krátké názvy ve formátu 8.3. Čísla v závorce Cropmks(x/n) udávají pořadové číslo zvolené značky (x), resp. celkový počet zjištěných značek (n). Na kartu můžete uložit nanejvýš devět značek pro ořez.
Vykřičník (!) zobrazený v menu znamená, že se během načítání značky pro ořez vyskytla chyba.
Získejte více značek pro ořez vytvořených uživateli Magic Lanternu z ML repozitáře.
Návod na vytvoření vlastních značek pro ořez viz. Cropmarks.
Tip: použijte Debug->Screenshot k získání bitmapy s odpovídající paletou barev.
Ghost image: OFF / Centered / Left / Right (náznak snímku)
Zobrazí průhlednou vrstvu (ducha) z kteréhokoliv snímku v režimu přehrávání.
Snímek vyberete stisknutím tlačítka LiveView v režimu přehrávání.
Spotmeter: OFF / Percent / IRE (bodový měřič)
Změřit jas ve středu snímku a zobrazit jej jako hodnotu v procentech nebo jednotkách IRE.
Tlačítka:
SET: povolit/zakázat bodový měřič
Q: změnit jednotku:
Procenta (0..100%)
IRE -1..101 (vzorec od AJe, který mapuje úrovně jasu 0-255 na přibližně -1..101 IRE)
IRE 0..108 (vzorec navržený Piersem, který mapuje úrovně jasu 16-235 na 7.5-100 IRE)
Poznámka: Při použití nízko kontrastních stylů Picture Style (jako Marvels Cine nebo Superflat) nemusí jas dosáhnout extrémních hodnot ani při silném přeexponování nebo podexponování snímku. Toto chování je v pořádku.
ClearScreen: OFF / HalfShutter / WhenIdle (vyčistit obrazovku)
Vyčistí bitmapová překreslení v LiveView displeji.
OFF: Vypnout; překreslení nebudou nikdy vyčištěna.
HalfShutter: Podržte spoušť namáčknutou do poloviny, tlačítko * nebo tl. náhledu hloubky ostrosti po dobu asi 1 sekundy a všechna překreslení v LiveView budou vyčištěna (audio, zebra pruhy, značky pro ořez, rychlost závěrky, ...). Můžete tak zkomponovat snímek bez dalších rozptylujících prvků.
Toto nastavení funguje nejlépe, je-li autofokus přiřazen tlačítku * (v menu Uživatel. funkce (C.Fn) nastavte C.Fn-9, resp. C.Fn-10 na 500D, Tlačítko závěrka/blokování AE na 1: Blok. AE/AF).
WhenIdle: V tomto režimu jsou všechna překreslení obrazovky vyčištěna (100% čistý displej), když je fotoaparát v nečinnosti.
Překreslení (zebra pruhy apod.) budou znovu vykresleny, když zobrazíte Q menu nebo namáčknete spoušť do poloviny, a pokud bude fotoaparát nadále nečinný, opět zmizí.
SET: toggle beteween available algorithms or turn the setting off
HDIF: looks at difference between adjacent pixels. Detects horizontal edges only. It is fooled by high-contrast, out of focus edges.
MORF: looks for fine detail lost by morphological opening and closing (which is a kind of blurring). It handles high-contrast OOF edges well, but is very sensitive to ISO noise.
Q: adjust percentile threshold, between 0.1% and 5%.
PLAY: select color mode
one of R,G,B,C,M,Y (a single color)
cc1: color coding 1 (show edge detection threshold as color, a single color for the entire frame; warmer = higher)
cc2: color coding 2 (show edge strength as color for every pixel)
This function enables zoom while recording. It is similar to Magic Circles from AJ builds, but here it's square.
When ML believes you have achieved perfect focus, Magic Zoom borders will become green.
Modes (change with SET):
OFF
Zrec: triggered by Zoom In button, pressed either while recording or while the LCD sensor is covered
Zr+F: triggered by Zoom In button while recording, and also by rotating the focus ring (only on lenses which report focus distance, or if you use follow focus / rack focus).
(*): triggered by Zoom In button (overrides Canon's default zoom modes). To bypass magic zoom, cover the LCD sensor or press both zoom buttons at the same time.
Size / magnification (change with PLAY):
Small (150x150)
Medium (250x200)
Large (500x300)
Small X2 : small with x2 magnification
Med X2 : medium with x2 magnification
Positions (change with Q):
AFF: moves with the AF frame (the little rectangle)
NW, NE, SE, SW: the zoom overlay is placed in one of the 4 corners. The zoomed area is still linked to the AF frame.
Magnification (linear):
while recording FullHD: around 2.4x.
while not recording: around 1.5x.
x2 setting doubles the magnification, but it does not add any extra detail (just doubles the pixels). It may be easier to see, though.
Notes:
On HDMI displays, it only works well during recording. It does not work on SD (RCA) displays.
It does not work in certain video modes (e.g. 720p) when not recording.
Half-pressing the shutter will hide the zoom overlay.
Split Screen: ON/OFF, zerocross
When the image is out of focus, Magic Zoom window looks similar to a split focusing screen commonly used in old film cameras.
This is just an alternate display for focus graph. It can't detect whether you are focusing too far or too close, and the display is only accurate a few seconds after you turn the focus ring and cross the perfect focus point.
Zerocross option will reverse the split direction whenever you achieve perfect focus.
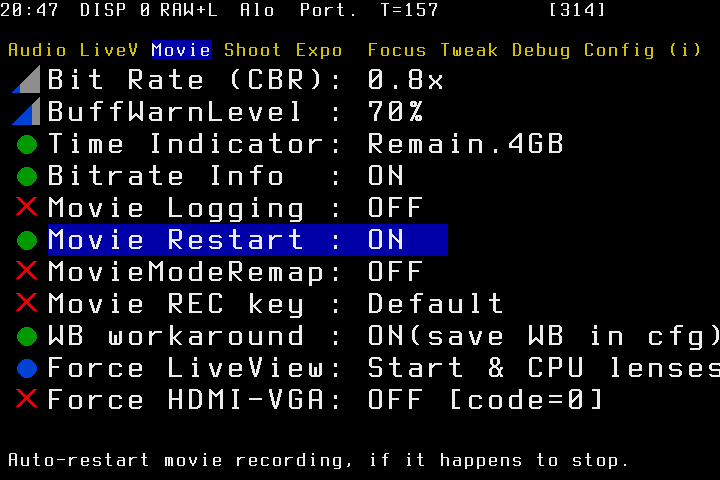
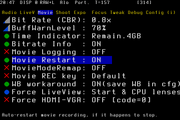
Movie[]
Movie menu
Functions specific to movie mode.
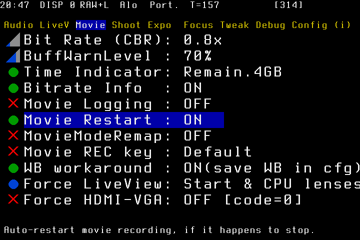
Bit Rate: CBR, 0.1x ... 3x
Controls H.264 bitrate used for video recording.
Possible modes (only CBR is available from menu; others can be selected only from magic.cfg):
CBR: constant bitrate. You specify a factor for multiplying default video bitrate, between 0.1x and 3x. CBR 1x is the firmware default setting. The implementation uses variable QScale, displayed near the recording dot.
FW default: default bitrate used by Canon firmware (CBR, around 45mbps in 1080p, including sound).
QScale: constant quality, variable bitrate (VBR). Available values: -16 ... +16. Lower numbers mean higher bitrates.
Keys:
Change numeric value with SET and PLAY
Reset bitrate to CBR 1x (firmware default) with Q
Notes:
There is a bitrate / QScale display near the red recording dot, updated every second.
Slower cards will not handle high bitrates, and recording will stop automatically if you try to use them. This includes certain cards labeled as Class10.
In QScale mode, bitrate varies a lot with frame complexity, and you have no direct control over its value.
In CBR mode, on scenes without a lot of details, QScale will not go further than -16, and bitrate will be lower than requested. As soon as frame complexity increases, the bitrate will increase too, and video may stop recording. In this case, bitrate meter will be displayed in red.
You can't change this setting during recording.
A red X means Magic Lantern did not make any changes to bitrate settings.
If buffer usage gets higher than this value, ML will display the buffer indicator in red and will pause all CPU-intensive graphics (almost everything from LiveV menu), which will allow movie recording tasks to use all available CPU power in order to avoid a possible buffer overflow.
Time Indicator: OFF / Elapsed / Remain.Card / Remain.4GB
When recording a movie, ML will display a small time counter in the upper right corner, which can be:
Elapsed: duration of the current clip
Remain.Card: estimated amount of recording time remaining on the card.
Remain.4GB: estimated amount of recording time until reaching 4GB (or until filling the card, whichever comes first).
Unlike Canon's timer which assumes constant bitrate, ML timer assumes variable bitrate and works even if QScale is enabled. However, due to variations in bitrate, the estimated value will fluctuate a lot, and this is normal.
Bitrate Info: ON/OFF
Display bitrate info (instant bitrate, average bitrate and instant QScale factor) around the recording dot.
Movie Restart: ON/OFF
While this setting is on, movie recording will restart automatically, unless stopped by you. There will be a few seconds skipped during restarting.
Movie logging: ON/OFF
If this setting is ON, Magic Lantern will write out a metadata file for the each movie to MVI_1234.LOG (numbered after the movie). The log file contains lens and exposure info, as well as a timestamp every time any of the parameters is changed during recording.
Log files are placed in the same folder as the movies: DCIM/100CANON/, 101CANON etc.
Tip: you can rename LOG files to CSV and import them in MS Excel.
MovieModeRemap: A-DEP / CA / C
Changes movie position on the mode dial. You can swap movie mode with either A-DEP, CA or C.
Alternative: press ISO and then press LV.
Movie REC key: Default / HalfShutter
This option enables you to start/stop movie recording by half-pressing the shutter button.
WB workaround: ON/OFF
Workaround for remembering Kelvin temperature and WBShift G/M and B/A values in Movie mode.
If this setting is on, these values are stored in config file. They will be shared between movie and photo modes.
Note: WBShift B/A can be only changed from Canon menu in photo mode, but with WB workaround enabled, WBShift settings will take effect in Movie mode, too (and also in auto modes, as a side effect).
Zebra when REC: Hide / Don't Hide
You can disable zebras during recording.
Force LiveView: OFF / Start & CPU lenses / Always
Force LiveView in Movie mode (bypass the dialog saying Press LV button to activate movie shooting).
Always: force LiveView even if you use an unchipped lens, or no lens at all. Be careful, you may get dust on the sensor while changing lenses.
Start & CPU lenses: it will force LiveView at startup, regardless of the lens used. After this, it will only bypass the dialog when a chipped lens is attached (i.e. it will enter LiveView as soon as you attach a chipped lens).
Force HDMI-VGA: ON/OFF
This option will force a low-resolution mode on HDMI displays (720x480), which:
Avoids getting black screen when you start recording;
Lets you use most items from LiveV menu (zebras, false color, histogram...)
Shoot[]
Shoot menu
Functions for stills shooting (some of them work for movies, too).
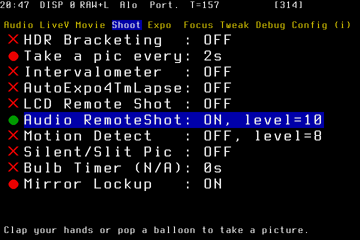
HDR Bracket
AE Bracketing for HDR images and timelapses.
Select number of images with SET and step size with PLAY. To turn this off quickly, press Q.
In M mode, this function does shutter bracketing. In the other modes it does exposure compensation bracketing.
HDR images can be taken with:
ML remote triggers: LCD face sensor & audio trigger.
ML intervalometer (for HDR timelapse)
Press the shutter. In this case, the first image will have the middle exposure (without EV compensation), and the 2-second self-timer will be used. Also, this mode only works with 3 images or more.
For best results, either use manual focus, or assign autofocus to * button.
For each HDR picture set, Magic Lantern also writes a bash script for stacking the exposures with enfuse (version 4.x). The scripts are stored in DCIM/###CANON and are named after the first picture in set, e.g. if the HDR sequence is created from IMG_1001.JPG ... IMG_1005.JPG, the HDR script will be named HDR_1001.SH and the resulting HDR image will be saved as HDR_1001.JPG.
To run the HDR scripts on the computer, move the scripts and the JPGs in the same directory and run (for example):
bash HDR_1001.SH
or, for processing all the images at once:
for f in $(ls *.SH); do bash $f ; done
On Windows, you can use Cygwin or MSYS to run the scripts.
Don't forget to delete the scripts from the card; the camera won't delete them!
Take a pic every X seconds / Record Y seconds, pause X seconds
Change the intervalometer settings (first setting appears in photo mode, second appears in movie mode).
There is also a mode named Take pics like crazy, which does exactly that. This is the best tool for killing your shutter.
Intervalometer: ON/OFF, Wait/NoWait
thumb|300px|right|Timelapse taken with the ML intervalometer, by Logan Stewart
Start/stop intervalometer.
In photo mode, it takes a sequence of photos with a fixed rate or delay (toggle with Q):
Wait: intervalometer waits until the picture is taken and saved to card, then starts counting the time for the next picture (default, fixed delay with 1-second resolution).
NoWait: timer for next shot starts as soon as current shot was triggered (it does not wait for exposure to finish, nor for picture to be saved). This ensures precise timing between shots (fixed rate). If the total time required for taking a picture is larger than the interval between two shots, it will miss some frames.
The Wait/NoWait setting has no effect in movie, HDR or bulb timer modes.
In movie mode, it takes a sequence of small videos
When HDR Bracket is active, each movie will be exposed according to the bracketing settings, and the duration of the movie will be multiplied by number of exposures.
To use the intervalometer in movie mode, make sure Silent Picture is OFF.
You can stop the intervalometer either from ML menu, or by pressing MENU or PLAY, or by changing the shooting mode. You can pause the intervalometer by holding the shutter halfway, or by opening ML menu.
Tips:
Shoot in manual mode and switch the lens to MF.
To save the shutter count when doing timelapses, enable Silent Picture or use the intervalometer in Movie mode.
Do not use the intervalometer in LiveView with "noisy" mode (otherwise your shutter will wear twice as fast than outside LV).
If the intervalometer can't be stopped (it may happen in crazy mode), turn the camera off or open the card door.
Power Saving:
When not in LiveView, press DISP to turn the display off. You may also cover the LCD sensor with something.
In LiveView, enable the Turn off display option. You also have to assign the focus on the * button (otherwise the screen will wake up). ML will NOT turn off the sensor.
While the intervalometer is running, the card led will blink once per second to let you know it's alive and kicking.
Note: ML will emulate half-shutter presses every second to prevent the camera from entering stand-by mode. You have to make sure it won't autofocus.
LCD Remote Shot: OFF/Near/Away/Wave
Start/stop remote shutter release mode with the LCD sensor.
⨂ Near: To take a picture, put your hand near the LCD sensor.
⨀ Away: Picture is taken when you get your hand away from the sensor. You may combine this setting with Mirror Lockup.
〰 Wave: Picture is taken after you wave your hand 3 times near the sensor. You can leave it on without interfering (too much) with normal shooting.
This feature is useful for avoiding camera shake.
In Movie mode, the Wave 〰 setting is able to start and stop recording movies. The other modes can only start recording (because it's too easy to stop recording by mistake).
Audio RemoteShot: ON/OFF
Start/stop remote audio trigger. To take a picture (or start recording a movie), make some loud noise, for example, clap your hands or pop a balloon.
You can also start movie recording with this feature.
In photo mode, you can combine this option with the self-timer (may be useful for group or self pictures).
Be careful: this may trigger the shutter from the sounds made by camera (like focus beep or liveview switch).
Motion Detect: OFF / EXP / DIF
Experimental motion detection.
EXP: it only reacts to brightness (EXPosure) change in the middle of the LiveView image. Useful for large moving subjects which cause significant change in exposure.
DIF: it computes the DIFference between last two frames A and B (luma channel only); it is useful for detecting smaller movements which do not change exposure. Trigger condition is:
Detection time is somewhere between 200 and 300 ms according to DataGhost's speed test; it's faster with silent pictures.
Silent Picture / Silent Pic HiRes / Slit-scan Pic
This can take pictures in LiveView mode without moving the mirror. When enabled, it saves uncompressed YUV422 frames from the LiveView buffer when you press the shutter halfway.
Make sure you don't have autofocus assigned to half-shutter press (put it on * or turn it off)
Modes:
Silent Picture: simple, low-resolution. Image resolution is usually around 1 or 2 MPix, and depends on the current mode (zoom or not, recording or not, and movie resolution). For almost-FullHD resolution (1720x974), choose FullHD to record a dummy movie. Details here.
Slit-scan Pic: this takes distorted images like these. This mode is basically an extreme jello effect which can be used in creative ways.
Keys:
SET: toggle modes (normal / slit-scan)
PLAY/Q: toggle between:
Single/Burst/FullHD in normal mode
timing (number of clocks to skip after each line) in Slit-scan mode.
Images are saved in DCIM/1xxCANON/ after the following rules:
If intervalometer is OFF, silent pics are named after last picture/movie taken without this function (e.g. 1234-001.422). You are limited to 1000 silent pictures for each "noisy" picture.
If intervalometer is ON, silent pics have names like 12345678.422. Tip: use File Numbering -> Manual Reset from Canon menu to increase folder number (to sort them easier).
To convert a 422 image to JPEG on the PC, use 422-jpg.exe (Windows and Wine) or 422-jpg.py (all platforms, you need to install Python, PIL and numpy). Double-click it, then select a single 422 file, or click Cancel and select a folder with 422 files. You can also use this program in command-line.
Note: FullHD option will cause errors during playback; they are caused by dummy videos which were removed by ML, but camera thinks they are still there. After restart, the errors will disappear.
TODO:
avoid that horizontal cut in pictures (vsync doesn't help and there's not enough RAM to buffer an entire image)
Bulb Timer: 1s...8h
Very long exposures with Bulb mode and ML timer. This feature is useful for night shots and astrophotography.
Bulb timer is started by half-shutter press, or by remote triggers / intervalometer.
Tip: you can cancel the exposure earlier by half-pressing the shutter button.
Mirror Lockup: OFF / ON / Timer+Remote
Mirror Lockup.
Timer+Remote will auto-enable MLU under one of the following conditions (and disable it otherwise):
self-timer mode is on (either 2 second or 10 second, but not continuous)
To get ISO values higher than 6400, turn on ISO Expansion from Custom Functions (CFn 1). To get ISO lower than 200, turn HTP off. In video mode, ISO only goes up to 6400. This is also true without ML.
To get only "round" ISO values, i.e. 100, 160, 200, 320, 400, 640, 800, 1250, 1600, 2500, 3200, 6400, 12800 and 25600, see ISO selection.
In manual exposure modes (photo and video), press the Q button on this entry to set the ISO value automatically.
When LiveView is active, a binary search algorithm is used; the search criteria is a good balance between overexposure and underexposure; search resolution is 1/8EV. If the contrast is very low, the histogram will be centered.
When LiveView is off, ISO is set using the Auto ISO feature from Canon firmware, in 1EV steps.
To compute exact ISO values from 100 to 6400, assumming 1/8 EV steps, use this formula:
WhiteBalance: 1500...12000
Kelvin white balance.
On 60D, extended range (*) is only available in Movie mode and LiveView. For still pictures, Kelvin WB will be clamped to the native range, i.e. 2500...10000.
In LiveView, press the Q button on this entry to set the WB temperature using the center color as reference gray. The measurement area is 200x200 pixels, centered.
WBShift G/M: Green 0..9 / Magenta 0..9
Green-Magenta white balance shift. Useful for fluorescent lighting.
Shutter: 1/24...1/4000
Custom steps for shutter speed, in 1/8 EV steps.
Assumming 1/4000 is native, you can use the EV definition to compute all available shutter speeds between 30s and 1/8000, resulting:
Assumming 30s is native, you will have:
The difference between results in these two cases is around 1.3%.
In manual exposure modes (photo and video), press the Q button on this entry to set the shutter value automatically.
When LiveView is active, a binary search algorithm is used; the search criteria is a good balance between overexposure and underexposure; search resolution is 1/8EV. If the contrast is very low, the histogram will be centered.
When LiveView is off, the shutter value is computed with the help of Auto ISO feature from Canon firmware, in 1EV steps. This feature is still experimental and sometimes it does not work.
Aperture: f/1.2...f/45.0
Adjust aperture.
Light Adjust: OFF/ALO/HTP
Select the light adjustment algorithm:
OFF
Auto Lighting Optimizer (low / standard / strong)
Highlight Tone Priority.
PictureStyle
Change picture style. You can see the effect on LiveView instantly.
Tip: you may assign the picture style to current display preset and toggle it with a single button press.
Contrast/Saturation: -4..4
Adjusts the contrast and the saturation of the current picture style.
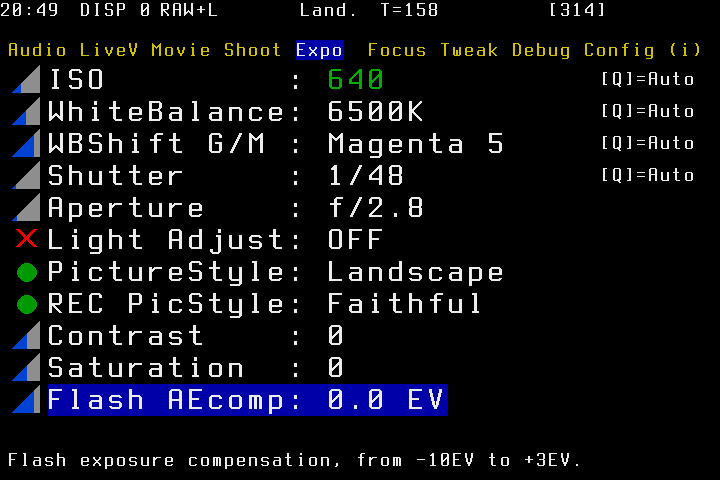
Flash AEcomp: -10..3 EV
Flash exposure compensation.
Focus[]
Focus menu
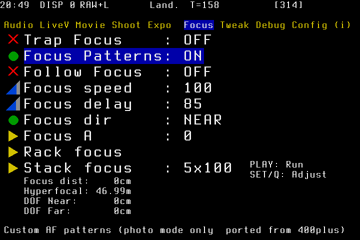
Trap Focus: ON/OFF
Takes a picture when the subject comes into focus. You need to set the to Manual focus (MF) and hold the shutter pressed halfway.
Outside LiveView, it only works with lenses with chip.
In LiveView it only works for photos, and it will take a picture when the focus indicator has (almost) maximum value on the focus graph.
Notes for LiveView trap focus:
You may have to turn the lens back and forth a few times in order to let ML compute the correct focus scaling factor for the current scene.
If you move from a high-contrast scene to a low-contrast one, you will also have to wait a bit until the high-contrast data disappears from the focus graph.
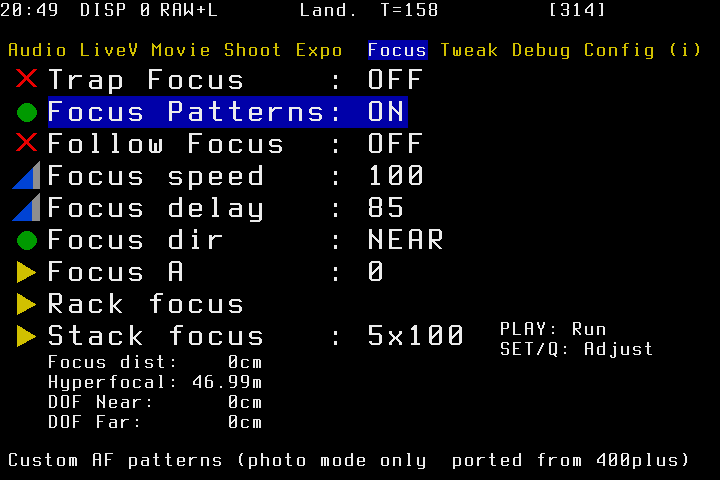
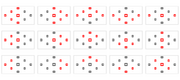
Focus Patterns: ON/OFF
Custom focus patterns which can be used either with autofocus or trap focus.
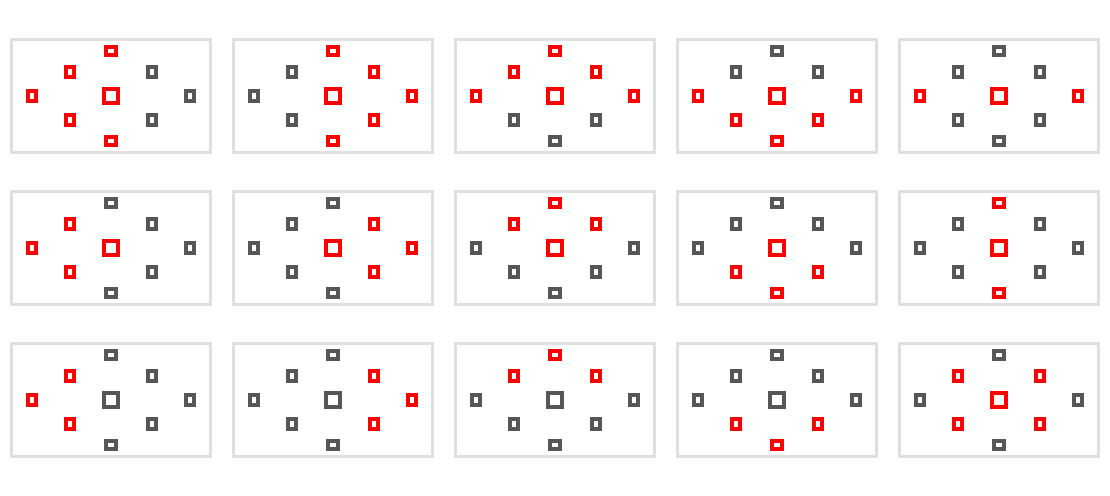
AF patterns
To change the focus pattern:
Set your camera in photo mode, non-LiveView;
Look through the viewfinder and make sure the LCD display is off;
Change the focus pattern with the arrow keys and SET; you may or may not receive visual feedback.
Press the Zoom In button twice to see the current selection.
You can use the custom focus patterns in LiveView Quick Focus mode, too, but the pattern won't be displayed on the screen.
This selection will shoot a series of photographs with varying focus points. It is used in macro photography to assemble sharper final images by merging photos where each has a different focus point.
This function will also create scripts named like named FST_1234.SH, which can be used for stacking the images with enfuse. See Exposure bracketing for details on how to use these scripts, and the focus stacking section from Enfuse reference manual.
Keys:
SET: change the number of photos
Q: change the focus step size
PLAY: run the stack focus sequence
Note: before using this feature, you have to assign autofocus to a separate button (for example, the * button), from Custom Functions.
Focus speed
Adjust speed for rack focus and follow focus, in focus steps.
Focus delay
Delay between two successive focus commands. See this article for details.
Follow Focus: ON / OFF
Very simple follow focus (like a rack focus controlled manually).
When this setting is enabled, it will change the default behavior of arrow keys, according to the following table:
Key
Speed
Direction
LEFT
slow
1x
far
+
↶
RIGHT
slow
1x
near
-
↷
UP
fast
5x
far
+
⤿
DOWN
fast
5x
near
-
⤸
You can reverse the direction for these keybindings:
Press Q to reverse the direction for LEFT/RIGHT keys (slow speed)
Press PLAY to reverse the direction for UP/DOWN keys (fast speed)
thumb|300px|right|Rack Focus Tutorial by Daniel Thurau
Focus dir
This is the direction the lens moves when pressing the camera's Zoom In button to set the focus start and end points.
Focus A
This is end point of rack focus. To set, focus the lens with the Zoom In button, then press "Set".
The start point will be the point where you are before selecting Rack focus in the menu.
Rack Focus
Triggers the rack focus operation that moves between the start and end focus points. After the move is complete pressing again reverses the move.
The following items are display only:
Focus Dist
The distance to the focal point. Value is returned by most newer Canon lenses. If the lens does not report any distance information, 0 will be displayed and the DOF calculations will not be correct.
The hyperfocal distance is the point of focus where everything from half that distance to infinity falls within the depth of field. This is the largest depth of field possible for the current f-number.
DOF Near
The nearest distance in which objects appear in focus.
DOF Far
The farthest distance in which objects appear in focus.
How rack focus works
Now that you know what the buttons are about, here is how you make it work:
Pick the end point of rack focus by focusing on it (manually or with AF).
Open the Focus menu, go to Focus A and press Set to zero it out.
Pick the start point by focusing on it from ML controls. Do NOT use autofocus and do NOT focus manually from the lens ring.
To focus the lens, make sure it is set on AF and use one of the following:
Option 1: choose Focus dir and hold on the Zoom In button while Focus menu is active.
Option 2: enable Follow focus, close the focus menu and focus with the arrows.
Select the focus speed. The number varies between different lenses and represents raw encoder steps for the focus motor.
Next, start movie recording (you can do that while ML menu is active).
Go to Rack Focus and press SET to start rack focus. You should see the rack focus commence and complete its cycle.
To return to the beginning point, you can press SET again to return to that point, once again.
Note: the rack focus command may "stutter" while racking with some lenses, causing overshoot or undershoot of the desired position. This feature is still under development and should be more mature in a later version.
Show: show the AF frame (just like the standard firmware)
AutoHide: the AF frame is only displayed when you move it, and then it disappears after 1 second or so.
LCD Sensor Shortcuts: ON/OFF
Enable the use of LCD sensor as an extra shift key. This function allows you to adjust white balance, LCD backlight level, move the AF frame when follow focus is active, or trigger Magic Zoom when not recording.
To fully disable the LCD sensor in Magic Lantern, disable LCD auto off from Canon menu (Wrench 1). You need to do this if you are using a device which covers the LCD sensor (e.g. a loupe).
Auto BurstPicQuality: ON/OFF
When enabled, it will temporarily reduce picture quality in burst mode in order to maintain a decent frame rate even when the buffer becomes almost full.
This function will reduce picture quality in the following steps:
RAW+JPG -> RAW -> JPG Large Fine -> JPG Medium Fine
JPG Large Coarse -> JPG Medium Coarse
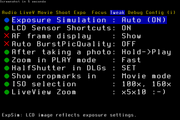
Exposure Simulation: OFF / ON / Auto
Exposure simulation (ExpSim) in LiveView display (for photo mode only).
ON: LiveView display image reflects exposure of the final image.
OFF: LiveView display image does not reflect the exposure, but may be useful for framing and checking focus.
Auto: ExpSim is:
disabled during zoom (x5, x10 and MagicZoom), but only if shutter is not pressed halfway;
enabled otherwise.
When ExpSim is off, zebra, histogram, waveform and false color are not displayed.
After taking a photo: QuickReview / Hold->Play
Image review behavior.
QuickReview: just like in standard firmware
Hold->Play: if you set Image Review:Hold in Canon menu, it will go to PLAY mode instead. This allows you to zoom in as soon as you take the picture (without having to press PLAY).
All values: use all available ISO speeds, in 1/8 EV steps
100x, 160x: use only native ISOs (multiples of 100) and ISO values with lower digital gain (multiples of 160).
PicSty->DISP preset
This option allows you to assign a picture style to each display preset.
After enabling this option, go through each display preset and select the desired picture style, either from Canon or ML menu. For example, you may assign the Technicolor CineStyle™ to DISP 0 for recording, and Portrait to DISP 1 for adjusting the exposure. In this case, you may also want to enable the exposure tools (RGB zebras, histogram, waveform) on DISP 1 and disable them on DISP 0 (and maybe enable Magic Zoom or Focus Peaking).
Crop Factor Display
If enabled, ML bottom bar will display the 35mm equivalent focal length, including crop factor (1.6x).
For example, a 50mm lens at f1.8 will be displayed as:
50 f/1.8 with this option disabled;
80eq/1.8 with this option enabled.
Swap MENU <-> ERASE
Swaps MENU and ERASE buttons. This feature allows one-handed navigation in ML menu on 60D, but will have to use MENU button to delete the pictures.
DispOFF in PhotoMode
On 60D, in photo mode, outside LiveView, a long half-shutter press will turn off the display if main shooting screen is active. You can turn it back on by pressing INFO.
LiveView Zoom: x5 / x10 / :-)
Control the zoom feature in LiveView. Change x5/x10 settings with PLAY and toggle :-) with SET.
x5: only x5 zoom will be available (disables x10 zoom)
x10: only x10 zoom will be available (disables x5 zoom)
x5x10: both settings available (Canon default)
:-) Enable zoom in Face Detection mode
Debug[]
Debug menu
Functions for troubleshooting, development, and possibly unstable features.
Some items from this menu may not be available in release builds; you can uncomment them from debug.c and create a custom autoexec.bin.
Draw palette
Tests the 8-bit bitmap palette, which is used for video overlays. See VRAM.
Screenshot (10 s)
Print screen after 10 seconds. It it saves a BMP file for the overlays and a 422 file (silent picture) for the LiveView image. The BMP does not contain transparency data. You can combine the two files in GIMP or other image editing programs.
The card LED will blink every second, until the screenshot is taken.
Debug logging: ON/OFF
When enabled, the camera stores a log which contains DebugMsg output. Press Q to dump the log to a file on the SD card. Disabling this setting might save a few CPU cycles.
mem: Display memory addresses which change, but not those which change like mad. Useful for detecting interesting Memory Addresses inside the camera RAM (like sensor & button locations).
To enable this feature, compile Magic Lantern with CONFIG_DEBUGMSG = 1.
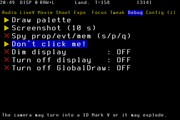
Dim display: OFF / after X seconds
In LiveView, if the camera is idle, Magic Lantern will reduce the LCD backlight level to minimum in order to save power.
Turn off display: OFF / after X seconds
In LiveView, if the camera is idle, Magic Lantern will turn off the built-in LCD display in order to save power.
Turn off GlobalDraw: OFF / after X seconds
In LiveView, if the camera is idle, Magic Lantern will turn off Global Draw in order to save power.
Config[]
Config menu
Magic Lantern saves its settings in a configuration file named magic.cfg. This menu lets you customize how these settings are saved.
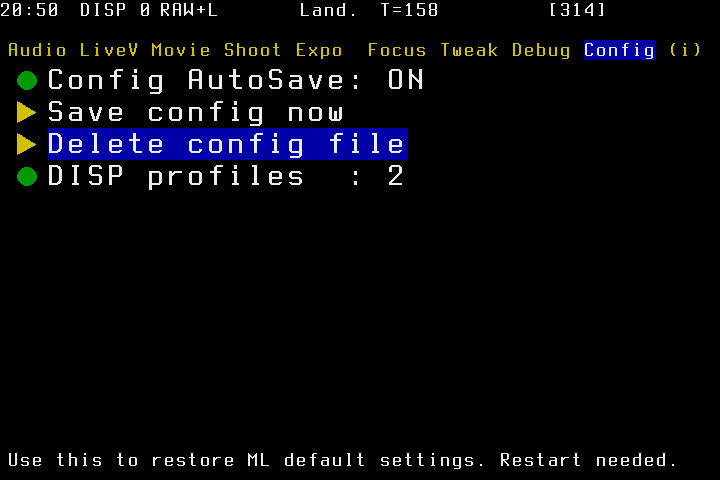
Config AutoSave: ON/OFF
If enabled, settings are saved automatically to magic.cfg whenever you change a setting in ML menu.
Config saving process will take place as soon as you close the menu.
Save config now
Saves ML settings to magic.cfg.
Delete config file
Deletes magic.cfg, which will restore ML default settings at next boot.
Note: This item will disable Config AutoSave for the current session, in order to make sure the config file won't be re-created when you close the menu.
DISP presets: 1..4
This feature lets you use up to 4 display presets for the settings in the LiveV menu.
On the top bar, you will see DISP 0, 1, 2 or 3. Each of those is a preset for the settings in LiveV menu. So you can, for example, configure DISP 1 with false colors, DISP 2 with zebras and focus peaking, and DISP 3 with clear display.
This menu item sets the maximum number of available DISP presets. To disable this feature, set the number of presets to 1.
To change the presets, press:
on 550D/500D: Flash button in Movie mode, or ISO followed by DISP in all modes;
on 60D: the Metering button.
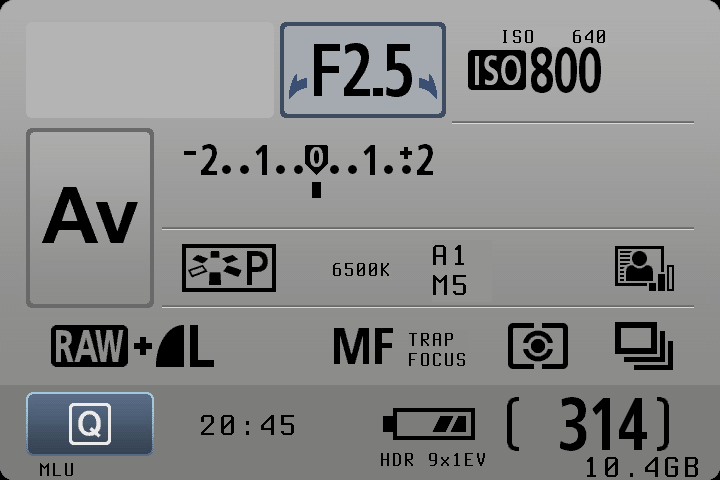
Extra info displays[]
Main shooting screen (outside LiveView)[]
Extra shooting info display
Clock (bottom of screen)
ISO value in finer increments (above Canon's ISO display)
This item is displayed when you enable Trap Focus.
It draws a small graph which shows the amount of focus in the AF frame (the little rectangle), over the last few seconds. Focus computation is done by Canon's autofocus algorithm.
Since the function which measures the amount of focus is heavily influenced by other factors (like contrast and exposure), ML attempts to normalize the value.
If you are focusing manually, try to position the lens such as you get a local maxima on the focus graph.
Power saving[]
Magic Lantern can help you maximize battery life while shooting, which also results in reduced overheat.
If you enable many CPU-intensive functions for LiveV menu, the battery will drain a bit faster.
Power consumption in movie mode, for Canon 550D, idle, 24p (approximate figures derived from this test):
Item
Current (approx)</thead><tbody valign="top">
Camera body (without lens), LCD off
360 mA
Lens (Tamron 17-50/2.8)
20 mA
LCD backlight at level 1
40 mA
LCD backlight at level 7
100 mA
Magic Lantern with GlobalDraw off
around 10 mA
Zebras
around 15 mA
Focus peaking
maybe 25 mA (not tested)</tbody>
NTSC
PAL
Mode
Current
Mode
Current</thead><tbody valign="top">
1080 30p
480 mA
1080 25p
450 mA
1080 24p
440 mA
1080 24p
440 mA
720 60p
520 mA
720 50p
490 mA
480 60p
520 mA
480 50p
490 mA
crop 60p
430 mA
crop 50p
420 mA</tbody>
Power consumption varies with the frame rate. The table above shows the difference between video modes. The test was done on a 550d with ML, body cap only, movie standby, lcd brightness 4, default settings, i.e. no magic.cfg at startup.
== Hidden settings ==
The configuration file (MAGIC.CFG) lets you tweak various hidden settings using a simple text editor (Notepad, gedit, vi...), and is also used to save Magic Lantern configuration from the GUI menu.
These settings can not be changed from the ML menu:
# Delay between clearing the overlay in Clear Preview mode
clear.preview.delay = 500

# Background color for waveform
waveform_bg = 20   # Semitransparent gray
waveform_bg = 3    # Semitransparent black
waveform_bg = 0    # Transparent

# enable QScale
h264.bitrate-mode = 2   # 0 is FW default, 1 is CBR, 2 is VBR
h264.qscale.plus16 = 8  # QScale plus 16 (range: 0..32)


![{\displaystyle 100\cdot 2^{k/8},\;\;k=[0:48]}](https://services.fandom.com/mathoid-facade/v1/media/math/render/svg/cad39358bbd0387d6dd824a6e4c29f6f0a7250d1)
![{\displaystyle 1/4000\cdot 2^{k/8},\;\;k=[135:-1:-8]}](https://services.fandom.com/mathoid-facade/v1/media/math/render/svg/d3f42375be4b3f74703b3b2f4d005d05157e72fa)
![{\displaystyle 30\cdot 2^{k/8},\;\;k=[0:-1:-143]}](https://services.fandom.com/mathoid-facade/v1/media/math/render/svg/73e0319267dae3168750db28e7519aff80b5ad15)


