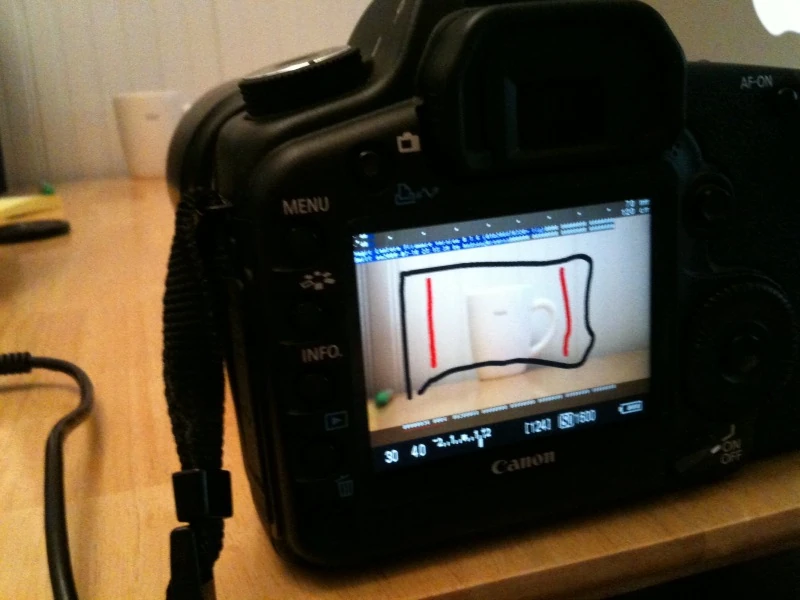
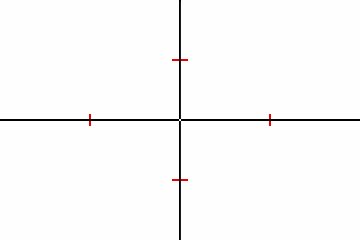
[[File:Cropmarks-test.jpg|thumb|Test cropmarks drawn in Paint]]
[[File:Cropmarks-test.jpg|thumb|Test cropmarks drawn in Paint]]
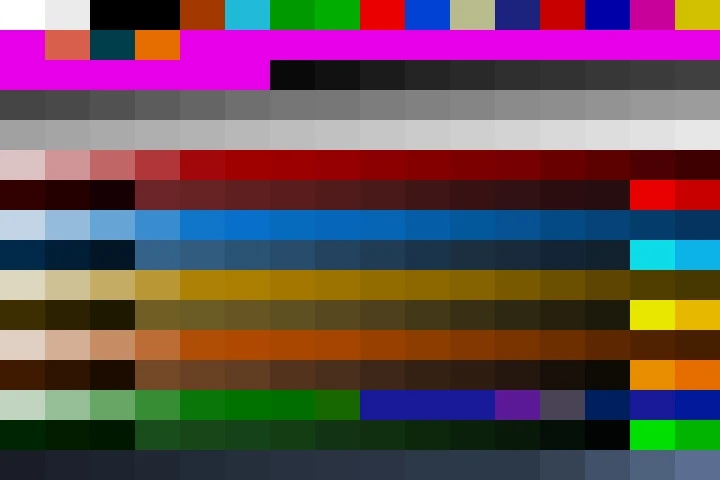
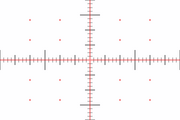
[[File:Palette.jpg|thumb|Palette used in LiveView for cropmarks]]
[[File:Palette.jpg|thumb|Palette used in LiveView for cropmarks]]
−
* Create a 720x480 image with 0.9 rectangular pixels (in which direction?) using the 8-bit palette shown. Scan lines 0-40 to 370-480 are will not be drawn.
+
* Create a 720x480 image (or any other resolution with 3:2 ratio) using the 8-bit palette shown. Only the first 20 entries have constant color (the other entries are camera-specific).
−
* HDMI output must use a 960x540 image. This is not fully supported or tested and will change depending on which information is being displayed on the image. While recording it will switch back to 480p, so separate images must be created.
+
* The cropmark image will be stretched to 3:2 and will cover the entire LiveView image area.
* Color 0 and 16 is transparent. Color 20 is semi-transparent.
−
−
* If using Adobe Photoshop; create a new document
−
* set width to 720 pixels and height 480 pixels with resolution 72 pixels/inch
−
* Color Mode: RGB Color, 8 bit
−
* Background contents: White
−
* Advanced settings
−
* Don't Color Manage this Document
−
* Pixel Aspect Ratio: Square Pixels; selecting D1/DV NTSC (0.91) will result in a narrower image.
−
* After completing your custom cropmarks select Save File as... BMP as OS/2 24-bit
−
−
−
{{clr}}
−
−
==550D / 60D / 600D /1100D==
−
−
* Create a 720x480 image using the 8-bit palette shown. Only the first 80 entries have constant color (the other entries change according to the skin used; in Play mode, the palette is ''almost'' the same as on 5D2). The entire cropmark will be drawn, and aspect ratio is 1:1.
−
−
* Color 0 is transparent. Color 3 is semi-transparent black. Color 20 is also semi-transparent, but more opaque.
You can also use this feature for custom composition grids. See [http://chdk.wikia.com/wiki/Grids CHDK grids page] for ideas. You need to convert the grids to 720x480 BMPs, of course.
You can also use this feature for custom composition grids. See [http://chdk.wikia.com/wiki/Grids CHDK grids page] for ideas. You need to convert the grids to 720x480 BMPs, of course.
Line 34:
Line 15:
You may use [[Remap.py|remap.py]] for converting any image to the correct palette. The script converts pure white to transparent and pure black to semi-transparent black.
You may use [[Remap.py|remap.py]] for converting any image to the correct palette. The script converts pure white to transparent and pure black to semi-transparent black.
−
−
{{clr}}
−
−
===Notes 60D===
−
−
* The same things apply as for 550D. However there is less free memory avialable on the 60D, so you should make your cropmarks smaller (some reduced-resolution cropmarks are included). Later builds added RLE compression to conservere memory, but you might still encounter Err70, when loading a more complex cropmark.
−
−
{{clr}}
===Photoshop step by step guide===
===Photoshop step by step guide===
This is done from Apple OsX (Snow Leopard/Lion) using Photoshop but I think that it could be done with any other software or operating system (with the right corrections).
This is done from Apple OsX (Snow Leopard/Lion) using Photoshop but I think that it could be done with any other software or operating system (with the right corrections).
−
#[[File:Screenshot_2011-08-18_14h_34m_30s.png|thumb|200px|cropmarcks settings for photoshop]]Create a new document with these settings (and consider saving them as a preset):
+
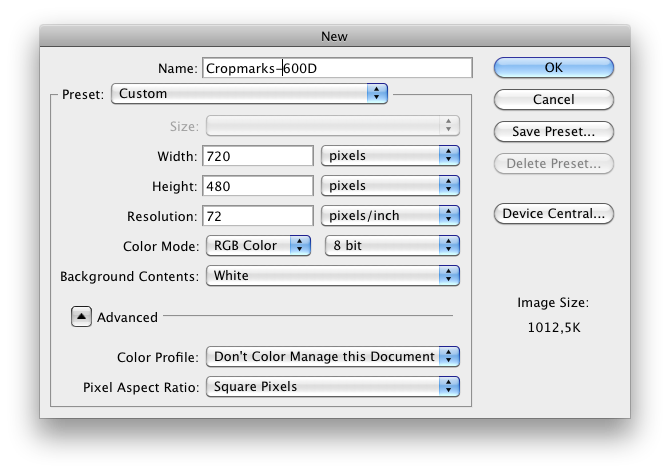
*[[File:Screenshot_2011-08-18_14h_34m_30s.png|thumb|200px|Cropmarks settings for Photoshop]]Create a new document with these settings (and consider saving them as a preset):
−
#*Pixel size 720x480 resolution 72 pixel/inch;
+
**Pixel size 720x480 resolution 72 pixel/inch;
−
#*Color Mode: RGB Color, 8 bit;
+
**Color Mode: RGB Color, 8 bit;
−
#*Background Contents: White;
+
**Background Contents: White;
−
#*ADVANCED
+
**ADVANCED
−
#*Color Profile: Don't Color Manage this Document
+
**Color Profile: Don't Color Manage this Document
−
#*Pixel Aspect Ratio: Square Pixels
+
**Pixel Aspect Ratio: Square Pixels
−
#Edit your document and draw your cropmark, white will be transparent, 95% black will be semi-transparent black;
+
*Edit your document and draw your cropmark, white will be transparent, 95% black will be semi-transparent black,
+
: NOTE: For 4:3 screens, try to avoid 1-pixel lines and 50% patterns, as you get aliasing and moire on the bitmap overlay, 3:2 screens don't have this problem;
−
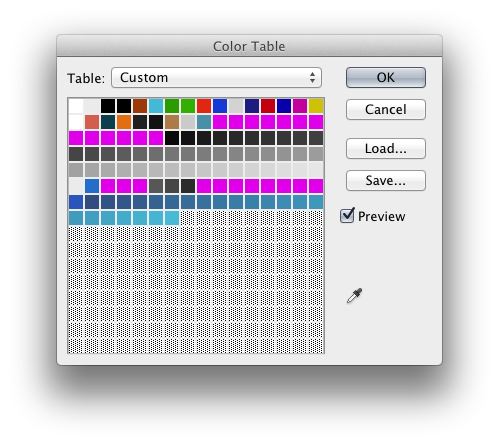
#[[File:Schermata_05-2456069_alle_17.34.44.png|thumb|ML colortable]]Before saving it as BMP you need to convert it to "Indexed Color" mode: Select from Image->Mode menu "Indexed Color", NOTE: this will flattern your levels and if you are already in indexed mode to see the Color Table window go to Image->Mode menu and select "Color Table..." ;
+
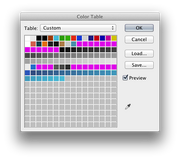
*[[File:Schermata_05-2456069_alle_17.34.44.png|thumb|ML Color Table]]Before saving it as BMP you need to convert it to "Indexed Color" mode: Select from Image->Mode menu "Indexed Color", NOTE: this will flattern your levels and if you are already in indexed mode to see the Color Table window go to Image->Mode menu and select "Color Table..." ;
−
##On the new window chose "Table: Custom" in the drop down menu and press "Load..." to load the [http://dl.dropbox.com/u/123918/MagicLantern/ML_ColorPalette%2BRubyScript_4_RLE_Compression_OsX.zip ML color palette (download .zip)] (you can make your own extracting it from a screenshot bmp made from ML);
+
*#On the new window chose "Table: Custom" in the drop down menu and press "Load..." to load the [http://www.mediafire.com/file/qwl9qi4y8wqzm9r color palette (MLcolortable.zip)] <span style="font-size:14px;font-weight:normal;line-height:22px;"> (file hosted on MediaFire) </span>(you can make your own extracting it from a screenshot bmp made from ML);
−
##Set Dither: None
+
*#Set Dither: None
: NOTE: colors can have been changed now specially if your cropmarks if fulll of shades of grey or colors. So now it's time for a color check and correction.
: NOTE: colors can have been changed now specially if your cropmarks if fulll of shades of grey or colors. So now it's time for a color check and correction.
−
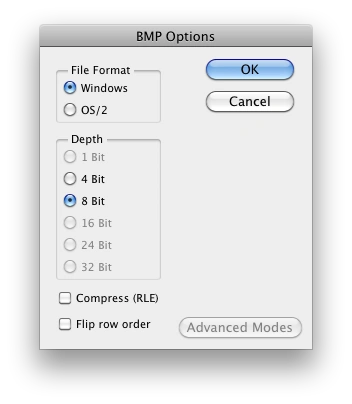
#[[File:Screenshot_2011-08-18_14h_47m_50s.png|thumb|200px|bmp options for cropmarks]]Click on File-> "Save as..." and select BMP for the Format, then use this settings for the BMP options:
+
*[[File:Screenshot_2011-08-18_14h_47m_50s.png|thumb|200px|bmp options for cropmarks]]Click on File-> "Save as..." and select BMP for the Format, then use this settings for the BMP options:
−
#*File Format: Windows;
+
**File Format: Windows;
−
#*Depth: 8 bit;
+
**Depth: 8 bit;
−
#*uncheck Compression (RLE);
+
**uncheck Compression (RLE);
−
#*uncheck Flip row order;
+
**uncheck Flip row order;
−
#To have a usable RLE compressed .bmp (required only for 60D, but good for all camera) we need to use the Sztupy's tool ([https://bitbucket.org/hudson/magic-lantern/raw/03b264ac8e16/convertrle.rb convertrle.rb] ). NOTE: the compress RLE function in photoshop don't make an usable cropmark (it will hang your camera)
+
*To have a usable RLE compressed .bmp (required only for 60D and 1100D, but good for saving memory on all camera) we need to use the Sztupy's tool ([https://bitbucket.org/hudson/magic-lantern/raw/03b264ac8e16/convertrle.rb convertrle.rb] ). NOTE: the compress RLE function in photoshop don't make an usable cropmark (it will hang your camera)
−
##Download the file:
+
*#Download the file:
−
##*from ML repo and go on with step 2;
+
*#*from ML repo and go on with step 2;
−
##*or [http://dl.dropbox.com/u/123918/MagicLantern/ML_ColorPalette%2BRubyScript_4_RLE_Compression_OsX.zip with ML colorpalette here] and skip to step 3;
+
*#*or [http://www.mediafire.com/file/qwl9qi4y8wqzm9r ML Color Palette here] (file hosted on MediaFire) and skip to step 3;
+
−
##From Terminal write: "''sudo chmod +x ''" without brackets and then drag ''convertrle.rb'' in Terminal's windows (this is needed only the first time to make the .rb file executable. '''Without this step you will have permission denied error''');
+
*#From Terminal write: "''sudo chmod +x ''" without brackets and then drag ''convertrle.rb'' in Terminal's windows (this is needed only the first time to make the .rb file executable. '''Without this step you will have permission denied error''');
−
##to compress the bmp image we made just drop ''convertrle.rb'' into Terminal and then drop the image you need to convert, you will end up having: ''path/to/convertrle.rb'' ''path/to/imagetocompress.bmp''
+
*#to compress the bmp image we made just drop ''convertrle.rb'' into Terminal and then drop the image you need to convert, you will end up having: ''path/to/convertrle.rb'' ''path/to/imagetocompress.bmp''
−
##hit enter to confirm and you will see a new file with extension .rle in the same folder of the original ''uncompressed .bmp''
−
##copyit to your''cropmks''folderonMLcardandremovethe .rle extensionsotohave ''filename.bmp''
+
*#hit enter to confirm and you will see a new file with extension .rle in the same folder of the original ''uncompressed .bmp''
+
*#copy it to your ''cropmks'' folder on ML card and remove the .rle extension so to have ''filename.bmp''
''NOTE:'' Last step is done from Apple OsX, on other system the procedure could not be the same. [http://www.ruby-lang.org/ Ruby] is required so check first to have it installed (I suppose it's installed by default on OsX).
''NOTE:'' Last step is done from Apple OsX, on other system the procedure could not be the same. [http://www.ruby-lang.org/ Ruby] is required so check first to have it installed (I suppose it's installed by default on OsX).
[[User:ScraxIT|ScraxIT]] 17:20, May 21, 2012 (UTC) UPDATED GUIDE, added a zip with ML color palette for photoshop and executable converterle.rb (to skip step 1 and 2 when using the script).
[[User:ScraxIT|ScraxIT]] 17:20, May 21, 2012 (UTC) UPDATED GUIDE, added a zip with ML color palette for photoshop and executable converterle.rb (to skip step 1 and 2 when using the script).
+
===Photoshop step by step guide (Video)===
+
[[File:Guide How to create custom cropmarks for Magic Lantern|thumb|left|365px]]
'''Question''': I have been unable to convert a B&W cropmark BMP using convertrle.rb. The converted image (on a Mac) looks fine but when I load the cropmark image into cropmarks/ the cropmark is completely wrong (ie. shades of pink and other colors show up). Steps followed: 1) create B&W horizontal gradient image and use 256 color indexed color mode 2) use convertrle.rb 3) copy & renamed the resulting *.rle image. I have also tried the same thing using an image with only 2 colors (black and white). Any ideas?
Here are some selfmade cropmarks with the procedure described [[Cropmarks#600D|previously]] , I've used the aureas.png from the 550 repository and a lot of ispiration came from the CHDK grids pages.
+
Image Magick is an open source software suite for image manipulation and runs on a variety of operating systems.
+
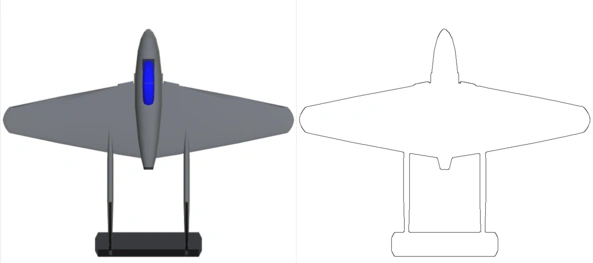
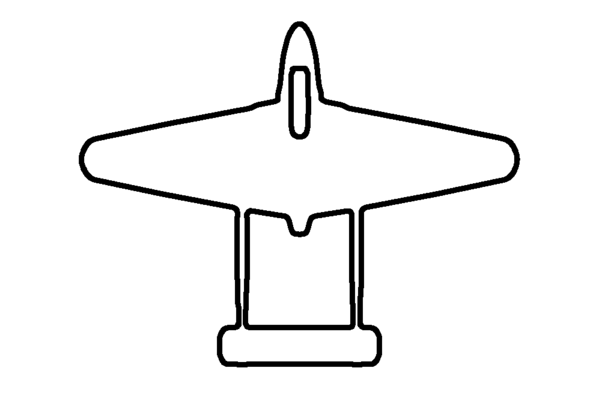
Rather than using Photoshop, I tried to quickly make a custom cropmark by converting an image by using Canny Edge Detection. The input image was a screenshot of an old fighter jet that was not in the correct (720x480) dimensions, or (3:2) ratio. White becomes transparent in the cropmark, other colors have varying degrees of visibility when used. Canny created an image on a black background of the aircraft outline in white, which using the "-negate" could be turned into a white background with black aircraft outline.
All the files can be downloaded from [http://www.mediafire.com/file/9ht8dq8pqdmpblt/600D-cropmarks.zip here] or you can use the png posted here to make your own if the link is down.
+
I converted the image from PNG to BMP and copied it into the CROPMKS directory and it displayed a garbled screen of noise when I selected the freshly added cropmark.
Noting that the dimensions were incorrect, I created a new canvas of 720x480 and then using a -geometry offset I positioned the smaller image "atop" the larger, 720x420 canvas.
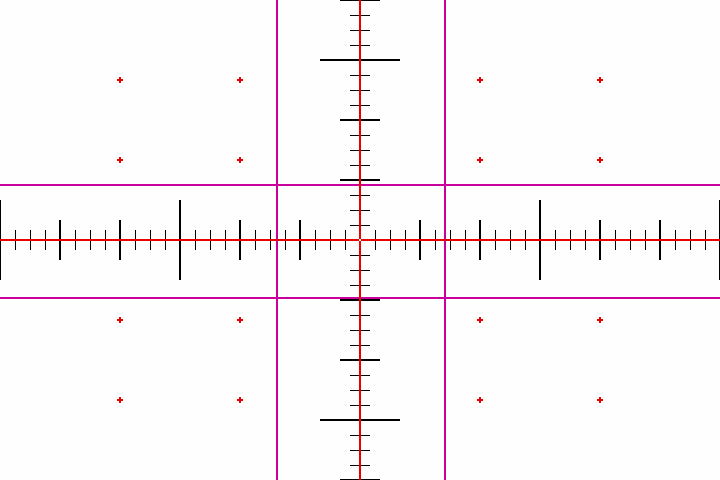
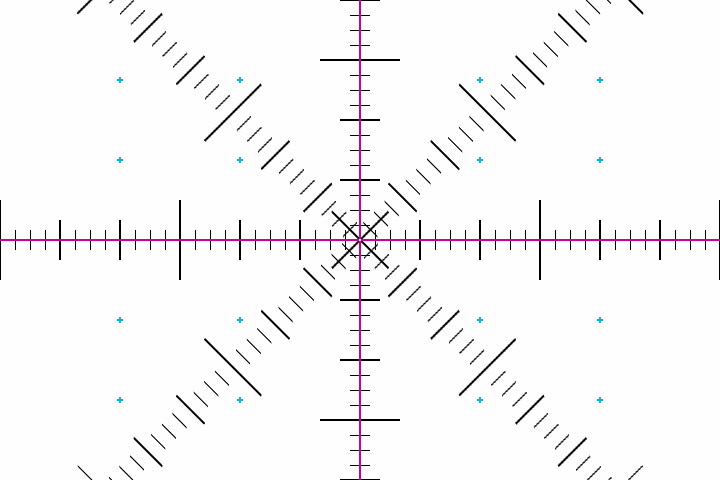
[[File:AuraCrMt.png|thumb|left|Golden rule and measurement cross, little cross at third intersections]]The central cross has a meter scale to help in measurement for macro photography. NOTE: It is still sperimental, i'm thinking on how better divide the scale.
+
Copying this new image as a BMP into the CROPMKS directory, I found I could select the new cropmark, but that it did not overlay the aircraft's outline in the viewfinder.
Intersection points fo thirds lines is show with little red crosses.
+
Looking at the notes for Photoshop above, I added a param to set the bit depth to 8, though Magick's "identify" command had previously told me that the image was already using that bit value.
When I copied the CMP onto the SD card, the new cropmark was accessible and produced the overlay in live-view that I had been seeking.
+
[[File:App can post vamp.png|thumb|304x304px]]
+
Here is the input image and the output after Canny edge detection had been inverted.
+
The process was iterative & I tried a few things such as taking one of the existing BMP's to modify, but I encountered the same lack of a visible overlay with the modified file, so reverted to creating a new file.
+
File permissions on the file did not need to be modified, but perhaps need to kept in mind.
+
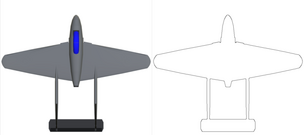
To thicken the width of the edge displayed the following param was used
+
[[File:THICK.BMP|thumb|151x151px]]
+
"-morphology Dilate Disk".
+
The thickened version provides greater visibility of the custom cropmark.
'''Question''': I have been unable to convert a B&W cropmark BMP using convertrle.rb. The converted image (on a Mac) looks fine but when I load the cropmark image into cropmarks/ the cropmark is completely wrong (ie. shades of pink and other colors show up). Steps followed: 1) create B&W horizontal gradient image and use 256 color indexed color mode 2) use convertrle.rb 3) copy & renamed the resulting *.rle image. I have also tried the same thing using an image with only 2 colors (black and white). Any ideas?
Here are some self-made cropmarks with the procedure described [[Cropmarks#600D|previously]] , I've used the aureas.png from the 550 repository and a lot of ispiration came from the CHDK grids pages.
All the files can be downloaded from [http://www.mediafire.com/file/9ht8dq8pqdmpblt/600D-cropmarks.zip here] or you can use the png posted here to make your own if the link is down.
[[File:AuraCrMt.png|thumb|left|Golden rule and measurement cross, little cross at third intersections]]The central cross has a meter scale to help in measurement for macro photography. NOTE: It is still experimental, i'm thinking on how better divide the scale.
[[File:CrssMtrX.png|thumb|left|A test with some different colors and a 45° crossmeter more.]]Just a test to see how complex I can go without problems...
[[File:CrssMtrX.png|thumb|left|A test with some different colors and a 45° crossmeter more.|720x720px]]Just a test to see how complex I can go without problems...
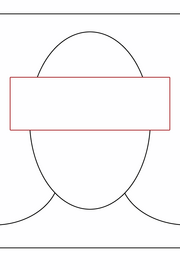
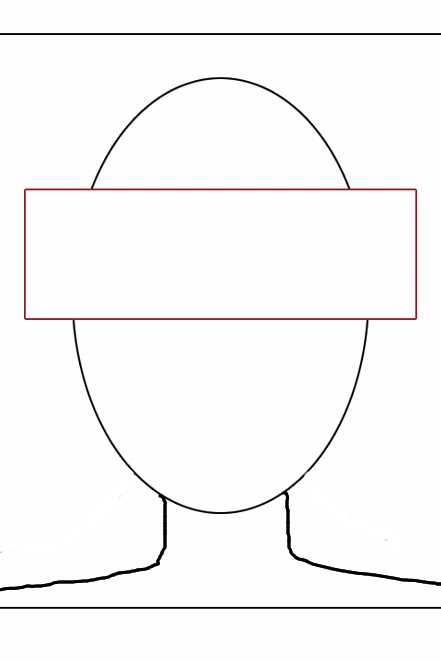
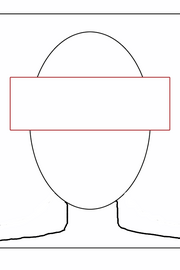
===Passport (new version, ISO/IEC 19794-5 compliant)===
===Passport (new version, ISO/IEC 19794-5 compliant)===
−
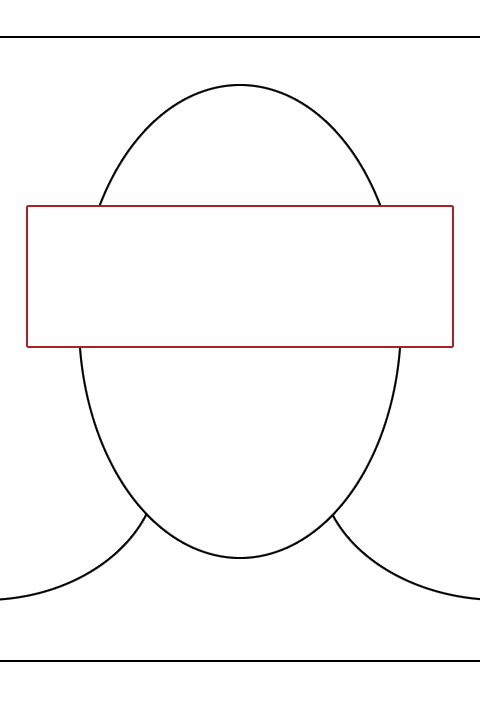
[[File:Passport.png|thumb|left|A passport portrait help for having the correct sizes.]]This is a guide for tacking correct passport portraits with min and max heigth, eye level etc.
+
[[File:Passport.png|thumb|left|A passport portrait help for having the correct sizes.]]This is a guide for taking correct passport portraits with min and max heigth, eye level etc.
It has an ideal black outline to center the subject and a red rectangle where eyes need to be placed.
It has an ideal black outline to center the subject and a red rectangle where eyes need to be placed.
Create a 720x480 image (or any other resolution with 3:2 ratio) using the 8-bit palette shown. Only the first 20 entries have constant color (the other entries are camera-specific).
The cropmark image will be stretched to 3:2 and will cover the entire LiveView image area.
Color 0 and 16 is transparent. Color 20 is semi-transparent.
You can also use this feature for custom composition grids. See CHDK grids page for ideas. You need to convert the grids to 720x480 BMPs, of course.
There may be tools available for converting CHDK's grd files to plain image formats.
You may use remap.py for converting any image to the correct palette. The script converts pure white to transparent and pure black to semi-transparent black.
Photoshop step by step guide[]
This is done from Apple OsX (Snow Leopard/Lion) using Photoshop but I think that it could be done with any other software or operating system (with the right corrections).
Cropmarks settings for Photoshop
Create a new document with these settings (and consider saving them as a preset):
Pixel size 720x480 resolution 72 pixel/inch;
Color Mode: RGB Color, 8 bit;
Background Contents: White;
ADVANCED
Color Profile: Don't Color Manage this Document
Pixel Aspect Ratio: Square Pixels
Edit your document and draw your cropmark, white will be transparent, 95% black will be semi-transparent black,
NOTE: For 4:3 screens, try to avoid 1-pixel lines and 50% patterns, as you get aliasing and moire on the bitmap overlay, 3:2 screens don't have this problem;
ML Color Table
Before saving it as BMP you need to convert it to "Indexed Color" mode: Select from Image->Mode menu "Indexed Color", NOTE: this will flattern your levels and if you are already in indexed mode to see the Color Table window go to Image->Mode menu and select "Color Table..." ;
On the new window chose "Table: Custom" in the drop down menu and press "Load..." to load the color palette (MLcolortable.zip) (file hosted on MediaFire) (you can make your own extracting it from a screenshot bmp made from ML);
Set Dither: None
NOTE: colors can have been changed now specially if your cropmarks if fulll of shades of grey or colors. So now it's time for a color check and correction.
bmp options for cropmarks
Click on File-> "Save as..." and select BMP for the Format, then use this settings for the BMP options:
File Format: Windows;
Depth: 8 bit;
uncheck Compression (RLE);
uncheck Flip row order;
To have a usable RLE compressed .bmp (required only for 60D and 1100D, but good for saving memory on all camera) we need to use the Sztupy's tool (convertrle.rb ). NOTE: the compress RLE function in photoshop don't make an usable cropmark (it will hang your camera)
From Terminal write: "sudo chmod +x " without brackets and then drag convertrle.rb in Terminal's windows (this is needed only the first time to make the .rb file executable. Without this step you will have permission denied error);
to compress the bmp image we made just drop convertrle.rb into Terminal and then drop the image you need to convert, you will end up having: path/to/convertrle.rbpath/to/imagetocompress.bmp
hit enter to confirm and you will see a new file with extension .rle in the same folder of the original uncompressed .bmp
copy it to your cropmks folder on ML card and remove the .rle extension so to have filename.bmp
NOTE: Last step is done from Apple OsX, on other system the procedure could not be the same. Ruby is required so check first to have it installed (I suppose it's installed by default on OsX).
ScraxIT 17:20, May 21, 2012 (UTC) UPDATED GUIDE, added a zip with ML color palette for photoshop and executable converterle.rb (to skip step 1 and 2 when using the script).
Photoshop step by step guide (Video)[]
Guide How to create custom cropmarks for Magic Lantern
Image Magick as Image Editor[]
Image Magick is an open source software suite for image manipulation and runs on a variety of operating systems.
Rather than using Photoshop, I tried to quickly make a custom cropmark by converting an image by using Canny Edge Detection. The input image was a screenshot of an old fighter jet that was not in the correct (720x480) dimensions, or (3:2) ratio. White becomes transparent in the cropmark, other colors have varying degrees of visibility when used. Canny created an image on a black background of the aircraft outline in white, which using the "-negate" could be turned into a white background with black aircraft outline.
I converted the image from PNG to BMP and copied it into the CROPMKS directory and it displayed a garbled screen of noise when I selected the freshly added cropmark.
Noting that the dimensions were incorrect, I created a new canvas of 720x480 and then using a -geometry offset I positioned the smaller image "atop" the larger, 720x420 canvas.
Copying this new image as a BMP into the CROPMKS directory, I found I could select the new cropmark, but that it did not overlay the aircraft's outline in the viewfinder.
Looking at the notes for Photoshop above, I added a param to set the bit depth to 8, though Magick's "identify" command had previously told me that the image was already using that bit value.
When I copied the CMP onto the SD card, the new cropmark was accessible and produced the overlay in live-view that I had been seeking.
Here is the input image and the output after Canny edge detection had been inverted.
The process was iterative & I tried a few things such as taking one of the existing BMP's to modify, but I encountered the same lack of a visible overlay with the modified file, so reverted to creating a new file.
File permissions on the file did not need to be modified, but perhaps need to kept in mind.
To thicken the width of the edge displayed the following param was used
"-morphology Dilate Disk".
The thickened version provides greater visibility of the custom cropmark.
Q&A:[]
Question: I have been unable to convert a B&W cropmark BMP using convertrle.rb. The converted image (on a Mac) looks fine but when I load the cropmark image into cropmarks/ the cropmark is completely wrong (ie. shades of pink and other colors show up). Steps followed: 1) create B&W horizontal gradient image and use 256 color indexed color mode 2) use convertrle.rb 3) copy & renamed the resulting *.rle image. I have also tried the same thing using an image with only 2 colors (black and white). Any ideas?
Here are some self-made cropmarks with the procedure described previously , I've used the aureas.png from the 550 repository and a lot of ispiration came from the CHDK grids pages.
All the files can be downloaded from here or you can use the png posted here to make your own if the link is down.
Aureal proportion and Cross Meter[]
Golden rule and measurement cross, little cross at third intersections
The central cross has a meter scale to help in measurement for macro photography. NOTE: It is still experimental, i'm thinking on how better divide the scale.
Intersection points fo thirds lines is show with little red crosses.
Aureal proportion lines are in a dark pink (sort of...).
Simple Cross with 1/4 points[]
Simple center cross, with 1/4 red intersections
A simple central cross with little red marks at 1/4 of the screen.
Cross Meter Only[]
CrossMeter only
A central red cross with a meter scale in black.
Cross Meter X(treme)[]
A test with some different colors and a 45° crossmeter more.
Just a test to see how complex I can go without problems...
Passport (new version, ISO/IEC 19794-5 compliant)[]
A passport portrait help for having the correct sizes.
This is a guide for taking correct passport portraits with min and max heigth, eye level etc.
It has an ideal black outline to center the subject and a red rectangle where eyes need to be placed.


